

Showing posts with label DIY. Show all posts
Showing posts with label DIY. Show all posts
7/22/2014
Pyramid coin purse
A coworker asked me to watch out for some coin purses for her. I thought I'll surprise her with something that has a little personality.

9/04/2013
DIY Stud/Ring Holder Tutorial
Hey! I received some positive response for my first tutorial, so I will be making another one.
This one is for the studs holder that I made a few weeks ago. I received some questions about it, so I decided to answer them using a tutorial.

This one is for the studs holder that I made a few weeks ago. I received some questions about it, so I decided to answer them using a tutorial.

8/28/2013
DIY Secret Earring Holder Tutorial
A while back, I posted an earring holder that I made. I received some requests for a how-to tutorial from some fellow crafters. This is my first tutorial, and I apologize that there will be no pictures to guide you in this tutorial. If anyone is interested in a video tutorial, please let me know in the comments below.
Supplies:
2 identical picture frames (I found mine at the dollar store for 2 dollars each, choose a frame that is thick, mine are about an inch in width)
1 plastic canvas (from Michaels for less than a dollar)
3 hinges (I took these off an old box, but you can find these at Michaels or at any hardware store)
1 closure
scissors
butter knife
mini screw driver (if your hinges and closure have screws)
glue gun (if your hinges and closure do not have screws)
pliers (optional)
Supplies:
2 identical picture frames (I found mine at the dollar store for 2 dollars each, choose a frame that is thick, mine are about an inch in width)
1 plastic canvas (from Michaels for less than a dollar)
3 hinges (I took these off an old box, but you can find these at Michaels or at any hardware store)
1 closure
scissors
butter knife
mini screw driver (if your hinges and closure have screws)
glue gun (if your hinges and closure do not have screws)
pliers (optional)
8/27/2013

8/22/2013
DIY studs/ring holder
I was inspired to make this stud holder after seeing some videos for ring holders. I love it. And the best part was, it costed next to nothing. I had this box for a while, because it was too cute to throw it away. I used some kitchen liners (those that prevent objects from slipping) and some thick cardboard.


4/30/2013
DIY Secret Jewelry Holder
Just an ordinary picture frame, with a little secret.
I posted the first jewelry holder I made years ago, however, that one became a little hassle when I went to university and started to move every few months. With this one,I can take it and go without worrying earrings will be lost. It also doesn't need to be hung on a wall, which make it nicer as well. The best part is it only costed about 6 dollars to make.
I posted the first jewelry holder I made years ago, however, that one became a little hassle when I went to university and started to move every few months. With this one,I can take it and go without worrying earrings will be lost. It also doesn't need to be hung on a wall, which make it nicer as well. The best part is it only costed about 6 dollars to make.

5/05/2011
DIY Little Watermelon
Winter is long behind us, and the weather is starting to warm up. I got this cute little beaded charm for you. It's a little watermelon. I beaded one myself, I'm not particularly great at beaded works, but it didn't take me very long, and the instructions are rather simple to follow. Have fun. I will put up my work next time.


12/26/2010
DIY Necklace Stand
Hey =)

Happy Boxing Day. All of you must be out getting those amazing deals that are on sale today.
Anyway, I went out on Christmas Eve, and bought a few supplies that I needed for the thing I wanted to make during the Holidays.
The first thing I wanted to make was a necklace holder. My necklaces are all tangled up in my cupboard and it's making me crazy every morning. Now my sleeping schedule is kind of messed up, I don't really have the time to untie it every morning. So I decided to find an idea to help me organize. I did a lot of research, but unfortunately many people were making necklace holders that you can hang on the wall. Some of them very similar to the one I made for my earring holder. That is actually a problem for me. Since I'm not allowed to have any nails on the walls of my rez, and I can barely hang my earring holder on that thin cork board of mine.
I did come across some really cool stands, but the one I really like is like a barbie doll stand. Unfortunately, there weren't anyone who made a stand like that, nor is there a tutorial. Anyway, I was thinking about buying a doll from the dollar store, and some how figure it out from there. Unfortunately, when I went shopping, I didn't find a barbie doll. But, I found something better. I was in the craft section of the dollar store, and I came across a little kit that said Fashion Studio. It was basically for making your own gowns that are doll sized. It came with fabric and pins and some stickers and lace. But I was only interested in the model it came with. When I saw that, I thought, 'I'm glad I didn't get a barbie doll, it is much more simple to make this stand up than a barbie.'
It took me a few hours on Christmas Eve, and today. But I finally finished. And I absolutely LOVE IT!
I didn't use any of the fabrics it came with. It wasn't as elegant or pretty as this fabric.

Hope you guys like it =)
9/01/2010
DIY Laptop Sleeve
After a LONG period of procrastination, I've finally finished the laptop sleeve, unfortunately just before I finished it, someone gave me a laptop bag. What are the odds of that? However, Since I've put so much effort into making it and designing it, I, of course will take it with me to rez.

It's basically a laptop size version of the lined-zippered pouch. I've seen many tutorials of those. They are pretty easy to make.
Anyway, I'm still packing, so I don't want to make such a long post.
Here is my final product:
Front view:

8/26/2010
DIY Boxy Pouch
As school is fast approaching, I realize that while in rez, my living space will be pretty small and furniture-less. I need a place to keep my small trinkets and such to keep my room neat and clean.

 It's probably because it's night right now, the pictures didn't turn out very nicely.
I decided to make a boxy pouch. It is very convenient because you can use it as a make up bag, jewelery bag. I wanted to make a couple, but I only have time to make two for now. I still have to finish the things on my list.
I didn't use one specific tutorial for this, but I have seen these tutorials before, but I didn't really like most of them, because they ended up cutting the corners off. I did like on particular tutorial, I think she did a great job. Projects by Jane has a few tutorials on boxy pouches, and I liked this one the best. Please check out her blog, she has made some really nice projects and I love her tutorials.
Here are the images:
I made two, one for myself and one for my best friend, Ki-Chan.

 It's probably because it's night right now, the pictures didn't turn out very nicely.
8/22/2010
DIY Kitty Pencil case
Wow, summer is almost over, but surprisingly I didn't actually make anything this summer. I've been so busy babysitting my brother. He's so troublesome and naughty.
The front:

Anyways, my to-do list is pretty long. Unfortunately, I won't be able to finish everything. So, I might have to put it off until next summer. I'm not bring any of my crafting stuff to rez, because then I would have to bring a lot of stuff. My room will be very small if i bring too much stuff, so i decided to leave it all at home.
I didn't actually make this pencil case this summer, I made it during the end of January. At the time, I wanted a bigger pencil case so I can fit my calculator in it. I actually lost my calculator right after I finished my second last exam of the term, my last exam was actually a math exam. So that whole thing was pretty messy. I thought it would be better if my pencil case was bigger. I did cut the fabric bigger than the original pattern, however it was still too small for my calculator. I messed it up during the winter, and never finished it. So a couple days ago, I decided to take it apart and redo it.
My final product, I absolutely love it.
The front:

6/27/2010
Going away present...
Heyy... so I've been a bit busy, haven't really made much. And I have yet to start on my plan. I found out polymer clay was a bit more expensive than I had expected and I'm currently broke. So I'm unsure of whether I should start a facebook shop or not.


I've been meaning to start on that bag before I forget how to make it, but my brother is keeping me pretty busy.
Anyway, one of my best friends told me some very depressing news a couple days ago. I decided to make her something before she leave.
Since it was last minute, the only thing I thought of was to make a plushie heart. The front side said "Good Luck" while the back side says "Luv Michelle". I hope she likes it and carry it with her ^^. It's very small, so it should be pretty portable.


Miss you sweetie, can't wait to hear your good news ♥♥♥
12/25/2009
Charming New Update
Can you believe it? Time goes by so fast. Today is already Christmas Day. It felt like not long ago that I made my last project. Since it's the holidays, I made a few small charms for my friends.
I made this one for the Secret Santa gift exchange.

I made this one as a Christmas gift add-on for a friend. It's composed of four ribbon flowers with a bell underneath.
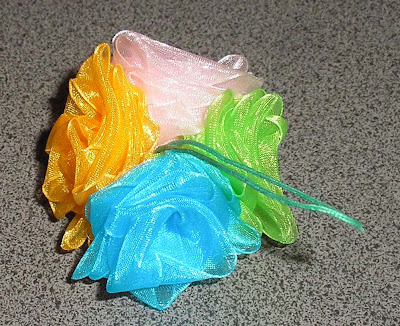

Anyways, that's it from me now. Hope I get a chance to make me things this holiday.
Merry Christmas Everyone!
9/06/2009
DIY Wallet
It's been a while since I've posted. For the past while, I didn't do much crafting.
Anyway, I did make one thing which I was rather pleased with. Although, it's not as great as I hoped. I spent a period of three days on it. Each day I worked on it a little bit. The first day I just cut the fabric pieces, which didn't take very long; but soon my brother woke up and I couldn't do much afterwards. The second day I cut out the interfacing and ironed them on, which took a long time. I had decided to cut interfacing for every piece because my fabric wasn't very strong. It did reinforce a little, but not alot. Ironing the interfacing took the longest. I tried to avoid my brother by ironing it downstairs, but he followed me downstairs and kept reaching for the scissors. The third day I stitch it all together and my end results were okay. All the interfacing caused the fabric pieces hard to match up. When I trimed my seams, I think I actually trimmed more than I was suppose to.
I couldn't wait to use it, so it already has a place in my purse and backpack.
Before I forget, I did use a tutorial for this. I really have to thank her, I've been staring at her tutorial for the past month and a half, just waiting to try it. Click here, if interested.
Here is my end result, Hope you like it.


I've been meaning to make more felt charms, but I haven't got insipired yet.
8/22/2009
Failure....
It has been almost three weeks since my last update. Over the course of the three weeks, I hadn't really done much. Right after summer school finished, I've started watching my brother. With him around, I couldn't do anything.
Anyway, I did make a couple of items. For the first week, I didn't make anything, mostly because I was waiting for my mom to take me to the store to buy fabric, interfacing and felt. My mom never did take me, but I did get the chance to go with a couple of my friends. I bought a couple of fabric, but they were rather biased.
The couple of items I've made did not stick to my original plan at all, mostly because I was too cheap to buy zippers. So I failed at following my original plan. I've decided that I still want to make the box pouch, but I don't plan on making the pencil case.
First Item:
I made this right after I bought fabric. I used some interfacing for it so it would be stiff. I think this one actually turned out rather nice.


Second Item:
I guess my mom rather liked the second triangular change purse I made. She asked me if she could have one of the two I made, but I told her I've already gave it away. She wasn't very happy with my reply, so I decided to make her one. This one didn't turnout as nicely as I'd hoped. Near the closing part, it's has some bulge. I originally wanted to post a tutorial, but I can't post one, until I've figure it out. Btw, this is one of the new fabric I bought.

 Third Item:
Another pencil case, the first one I made was intended for someone else, so I had to make myself one as well. This one is a bit shorter than the first one, this one actually looks a lot worse than the first one. I decided to change the dimension, because that one was too long for my pencils. Unfortunately, when I was cutting out the fabric, I didn't notice that I didn't cut the dimension I calculated, but the new and old dimensions combined. After that part got fixed, I somehow decided to cut the circle smaller. That didn't work out at all. So all in all, it was a big mess. Good thing I made this one for myself, so it doesn't really matter to me.

 I'm not sure about anyone else, but I've had many pencil cases. In everyone of them, I always had to dig really deep to find a pencil, or my usb.
I actually prefer to have all my things resembles retractable pens. So all of my things, pencils, erasers, highlighters and pens all resembles retractable pens. With this new pencil case, it's much more easier to find things. The only problem I realized yesterday is, I forgot my wite-out. The only thing I don't like it to be a pen shape is my wite-out, mostly because the pen wite-out smells really bad. Oh well, I'll just have to find some where else to put it.
I'm planning to make a tutorial for this pencil case. So keep your eyes open!
Fourth Item:
A couple days ago, I got my mom to take me to the store, and I bought some felt. After I came out of the store, I told my mom my felt colours were really biased. I had bought them in blue, pink and grey. The three colours that occurs most often in my wardrobe. Anyway, I had bought the white felt when I went shopping with my friends. I originally used pink felt for the bow, but it didn't really work out. I made this last night, but this morning I realised that Kitty didn't have any whiskers. It's too late to add it now. Anyway, I made this for a friend I hope she'll like it as much as I do.
Here is my original drawing:


Anyway, that's all for now. Hopefully, you enjoyed looking at the pictures.
8/03/2009
Another Change Purse
So after eating my brownies, I realized the ones in the center actually tasted like brownies.
Anyway I got more bored afterward, and I wanted to make something, but I still don't have interfacing or felt.
So I decided to make another change purse, but I didn't want to use velcro again. When I made the last one, I was complaining to my friend about the velcro, and she gave me a good idea. I decided to try it, and this is what I ended up with.
Since I don't need two, I've decided to give this one to the friend who've given me the idea.


8/02/2009
Triangular Change Purse
So after working on it for about an hour without any instructions, I've made countless mistakes. In the end, I was able to finish it. It actually look okay for my first trial.
It actually looked a bit different than the example I had. I wasn't planning on starting it so soon, but after posting the first post, I couldn't wait. All the materials I used are from before. The blue precious moment fabric was my left over fabric from fashion class. The ribbon was something I found in my crafting drawer. The lining was also left over from fashion class, it was the lining I used for my dress.
I didn't use a zipper, since it wasn't planned I didn't have a zipper small enough. I used velcro instead, and it taught me a lesson. Velcro is really hard to sew, they kept sticking to my thread.
My change purse is not as nice looking at the example, probably because I didn't press it while i was sewing, so it looks really wrinkly. I should have probably used interfacing too, the change purse I made is rather soft.
Anyway, hope you enjoy looking at the pictures.


Please comment if you have any questions =]
8/01/2009
First Post
Anyway, for my first post, I want to show an earring holder that I made yesterday. It's not really that good, but it's not completely bad. After so many tutorials, and my failed attempt, I finally found the right material to allow me to make an earring holder.

Overall this earring holder costed me about 3-4 dollars max?
Although it's not professional, but I'm still proud that I was able to make an earring holder that can hold all my earrings without annoying me everyday.
You may notice that I have ALOT of star earrings. I just really like stars, to me they're the most amazing shape.
Some of the earrings on it are made by me, while others are bought. Later on, I will post up earring tutorials for earring lovers.
Now that summer school is over, my goals for the rest of the summer is to make a couple of things:

Triangular shaped change wallet. They are so cute. I don't know if i'll be able to make this, I found this picture on a chinese forum, but the person who posted this didn't post a tutorial.

I'm unsure of who made this, but I found a tutorial that teaches you how to make these box pouches.

Finally I found this, it's a pencil case, it's rather cute. This one seem really simple, except for the zipper part. I think I will also try to make this.
I think once I finished these, if others like it, I will post up a tutorial. I'm sure no one want to hear opinions made by someone who don't know what they're talking about. So I will only post one if others want to learn.
Subscribe to:
Posts (Atom)